Quick Info
Model
452
Estimated Cost
€5 – €10
Difficulty
Intermediate
Time Required
12 – 14 Hours
Safety Notes
Chemical Hazard: Bleach is highly corrosive and produces strong fumes. Always wear nitrile gloves and eye protection. Work in a well-ventilated area (ideally outdoors or in a bathroom with an extractor fan).
Skin Irritation: If bleach touches your skin, wash it off immediately with plenty of water.
Plastic Fragility: Be gentle when removing and reinstalling the tail light units; the plastic mounting points on the car can be brittle.
Electrical Safety: Ensure the light units are 100% dry before reconnecting the bulb holders to avoid short circuits.
Step-by-Step Guide
Introduction
The standard Smart Roadster tail lights feature a silver/chrome internal bezel that can look a bit dated on certain car colors. While many owners use tint spray or vinyl film on the outside of the lens, these methods can often reduce light visibility or look "cheap" up close.
The Bleach Method is different. It targets the silver coating on the plastic housing inside the light. Laundry bleach (sodium hypochlorite) reacts with the thin silver/chrome layer, dissolving it and revealing the dark, high-gloss black plastic underneath. This results in a "stealth" look that looks completely factory-made, while the red and clear lenses remain perfectly transparent. This is a permanent modification that cannot be easily reversed, so ensure you are committed to the black look before starting.
Removing the Tail Lights
Open the rear hatch. Locate and remove the screws holding the tail light units in place. Carefully pull the units toward the rear of the car and disconnect the bulb holders. Set the bulb holders aside in a safe, dry place.


Preparing the Units
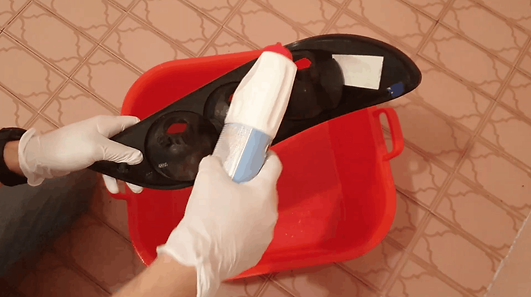
Ensure the tail lights are clean. You do not need to take the lens off; the bleach will be poured through the bulb holes. Use a piece of waterproof tape to seal the small ventilation holes if necessary, though the main bulb holes will be your primary access.
Filling with Bleach
Place the tail light unit in a plastic tub or sink. Pour approximately 750ml of laundry bleach (e.g., Domestos) into the light through the bulb openings.
Tip: Rotate the light housing to ensure the bleach covers all the silver surfaces inside.

The Waiting Game
Let the bleach sit inside the unit. You will see the silver color begin to vanish after about 2 hours. For a perfect, consistent black finish, it is recommended to leave the bleach in for 12 hours. Periodically check the progress by looking through the lens.
Rinsing, Flushing, Drying
Once the silver is completely gone, pour out the bleach. Flush the interior of the tail light unit thoroughly with warm water. Continue rinsing until no bleach smell remains and all chemical residue is washed away.
This is the most critical step. Any moisture left inside will cause fogging.
Place the units in the sun for several hours or use a hairdryer (on a low/cool setting) to blow air through the bulb holes until every drop of water is gone.
Once 100% dry, reconnect the bulb holders, test that all lights (indicators, brake, reverse) work correctly, and screw the units back onto the car.
