Quick Info
Model
450, 452
Estimated Cost
200-300€
Difficulty
Intermediate
Time Required
1 - 2 Hours
Safety Notes
Secure Support: Never work underneath the car while it is supported only by a jack. Use jack stands on reinforced chassis points.
Tension Awareness: Even when jacked up, the sway bar can retain some tension if the car is not level. Be careful when releasing the final bolts to avoid the bar "snapping" downward.
Ball Joint Inspection: While the end links are disconnected, check the rubber boots for tears. If they are worn, this is the perfect time to replace them.
Torque Check: After a few heat cycles (approx. 100km), re-check the mounting bracket bolts to ensure they haven't loosened due to the increased stiffness of the new bar.
Step-by-Step Guide
Introduction
The Smart Roadster and Fortwo (450) were designed with a "safety-first" philosophy, which often meant engineering a fair amount of understeer into the factory suspension. While the original 19mm front sway bar (anti-roll bar) is competent for city driving, it quickly reaches its limit during spirited cornering or track use. As the chassis leans, the inside tire loses contact patches, and the front end begins to "push" wide—a sensation every Smart owner knows all too well.
Upgrading to a 22mm Performance Sway Bar is widely considered the single most effective mechanical change you can make to the front-end geometry. By increasing the bar diameter by just 3mm, you aren't just adding a thicker piece of steel; you are exponentially increasing the torsional stiffness of the front axle. This keeps the car significantly flatter through high-speed transitions, allowing the tires to maintain a much more consistent contact angle with the asphalt.
This upgrade doesn't just reduce body roll; it fundamentally sharpens the car's "turn-in" response. The delay between turning the steering wheel and the chassis reacting is virtually eliminated. When paired with high-density polyurethane or heavy-duty rubber bushings, the 22mm bar transforms the Smart from a nimble city car into a precision-focused cornering machine.
In this guide, we break down the installation process—from navigating the tight clearances of the front subframe to the essential lubrication techniques that prevent the "squeaking" often associated with stiffer setups. If you’re looking to kill understeer and give your Smart the "bite" it deserves, this is the upgrade you’ve been waiting for.
Preparation & Lifting
Park the car on a level surface. Jack up the front end of the vehicle and secure it on jack stands. Remove the front wheels to gain clear access to the sway bar end links and the mounting brackets located behind the steering rack.

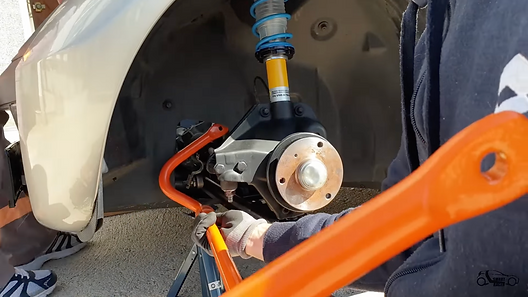
Disconnect the Sway Bar End Links
Locate the ball joints (end links) that connect the sway bar to the struts. Use a wrench to hold the back of the joint while unscrewing the nut with a socket. Once loose, pull the links away from the bar. If they are stuck, a light tap with a rubber mallet may be necessary.
Remove OEM Bar & Bushings
Unbolt the two main brackets holding the sway bar to the subframe. Once the brackets are removed, carefully slide the original 19mm bar out from the side of the wheel well. Remove the old rubber bushings from the brackets and clean the mounting area of any road grime or rust.


Install 22mm Bar & New Bushings
Slide the new 22mm performance bar into position. Apply a generous amount of silicone or copper grease to the inside of the new, larger bushings to prevent future noise. Snap the bushings onto the bar at the mounting points and reposition the metal brackets over them.
Secure and Reconnect
Hand-tighten the bracket bolts first to ensure proper alignment, then torque them to factory specifications. Reconnect the sway bar end links to the new bar and tighten the nuts firmly. Replace the wheels, lower the car, and take it for a test drive to feel the immediate difference in cornering stability.
