Quick Info
Model
450, 452
Estimated Cost
400-600€
Difficulty
Advanced
Time Required
6 Hours
Safety Notes
Never start a newly installed turbocharger dry. Running the compressor wheel without oil pressure—even for a few seconds—will permanently destroy the internal bearings. You must pre-lubricate the turbo and perform a dry-crank sequence before the first true engine start.
Thermal Hazards: Ensure the engine, exhaust manifold, and coolant system have cooled down completely (minimum 4 hours after driving) before beginning. Working on a hot engine risks severe skin burns from metallic surfaces and pressurized boiling coolant.
Eye and Skin Protection: Always wear safety glasses and chemical-resistant gloves. Pressurized fuel, toxic engine oil, and caustic antifreeze will be released during line disconnection.
Chemical Handling: Position a broad drainage bucket directly underneath the engine bay before loosening banjo bolts. Dispose of all used engine oil, oil filters, and contaminated antifreeze responsibly at a certified recycling facility.
Workspace Stability: Ensure the vehicle is parked on a level surface, the handbrake is firmly engaged, and the rear wheels are raised using rated jack stands or a professional workshop lift. Never work under a vehicle supported only by a hydraulic jack.
Step-by-Step Guide
Introduction
The turbocharger is the mechanical heart and lungs of the Smart Roadster (452) and the Smart Fortwo (450). Engineered around a compact, high-revving Suprex three-cylinder engine architecture (whether in its 599cc or 698cc iterations), these vehicles rely heavily on forced induction to extract respectable, spirited performance from a remarkably small displacement. Because the engine is tucked away tightly in a mid-rear bay configuration, the turbocharger operates under an incredibly punishing, high-thermal environment. Over years of hard driving, intense heat cycling, and high mileage, even the most meticulously maintained factory turbos will eventually reach the end of their operational lifespan.
These failures show up as erratic boost pressures, underboost check engine lights, sluggish throttle response, or thick white smoke billowing from the exhaust. Replacing a worn assembly with a fresh kit—such as a BR Turbo unit paired with high-performance RDI lines for the oil and coolant feeds—is a rewarding mid-level DIY project. Ditching the rigid, brittle factory lines for inox RDI plumbing eliminates common installation alignment issues and prevents future stress cracks.
Following this systematic 5-step process will completely restore factory engine response, clean up emissions, and ensure your car is track-ready.
Rear Bodywork and Crash Bar Removal
The mid-rear engine configuration of the Smart Roadster requires freeing up the rear structural area to establish adequate mechanical clearance.
Bumper Removal: Detach and pull away the complete rear plastic bumper assembly.
Crash Bar Disassembly: Locate and extract the three T45 Torx bolts securing the rear structural crash bar (one bolt sits on the upper horizontal plane, one is positioned directly underneath, and the final bolt fastens from the side).
Access Assessment: With the crash bar out of the way, you gain unhindered access to the right-hand engine mount, the full exhaust assembly, the lower spark plug wires, and the intercooler plumbing network.


Exhaust System and Intake Plumbing Detachment
To allow the structural removal of the old manifold and turbo assembly, you must completely uncouple the air track and the exhaust stream.
Exhaust Pipe Removal: Unbolt the top structural exhaust bracket, remove the two primary securing fasteners connecting the exhaust pipe directly to the turbocharger housing, and release the bottom support bracket to drop the exhaust out of the car.
Intercooler Piping: Loosen the hose clamps and detach both the upper and lower rubber boost hoses feeding into and out of the intercooler.
TIK Pipe Extraction: Disconnect the primary TIK pipe (the plastic hardpipe routing air from the airbox down to the compressor inlet of the turbo). Carefully pull the small vacuum hoses off the electronic switches attached to the pipe, noting their exact positions, and check for rubber fatigue or cracks.
Sensor Uncoupling and Fluid Drainage
The turbocharger is both oil-cooled and water-cooled, meaning all thermal management lines must be drained and decoupled systematically.
Lambda Sensor: Fit your specialized deep lambda socket over the oxygen sensor embedded in the exhaust housing and back it out carefully to avoid damaging the internal ceramic element.
EGR Return Line: Unbolt the exhaust gas recirculation/return line by loosening the two 11mm nuts and the primary stabilizing bolt.
Coolant System Drainage: Position a large bucket beneath the engine block. Locate and unfasten the lower coolant drainage plug or release the lower water banjo bolt to evacuate the antifreeze out of the expansion tank and turbo housing.
Fluid Line Disconnection: Using 17mm and 22mm keys, extract the upper and lower banjo bolts securing the hard oil feed, oil return, and coolant supply lines. Keep track of the spent copper washers.

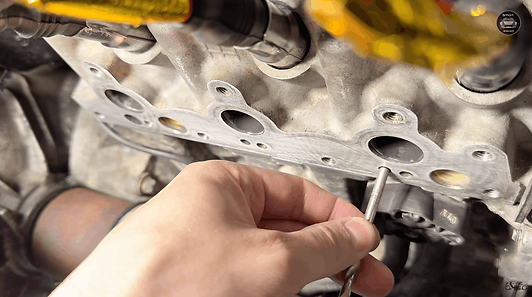
Turbocharger Extraction and Surface Remediation
Removing the old unit from the engine block often uncovers decades of heat cycling, meaning care must be taken with the structural studs.
Manifold Unbolting: Back off the nuts pinning the integrated exhaust manifold to the cylinder head studs. If a stud binds or shears, employ the "double-nut technique" (lock two nuts against each other midway up the remaining thread, then use a wrench on the inner nut to turn the stud out of the head).
Manifold Surface Prep: Once the heavy turbocharger unit is pulled clear of the engine bay, use a fine-grit sandpaper or a flat surfacing block to scrub away old carbon deposits, rust, and material burrs from the exhaust ports on the cylinder head.
Gas Channel Scouring: Clear out the exhaust gas passages and emissions channels utilizing a wire brush attachment on a drill to guarantee smooth, unrestrictive gas flow for the replacement unit.
New Turbo Installation, Vacuum Routing, and System Priming
Stud Setup: Apply a thin layer of high-temperature copper grease to the threads of each new exhaust stud before hand-threading them into the cylinder head. Slide the fresh multi-layered steel gasket over the studs.
Manifold Torquing: Mount the new turbocharger. Apply copper anti-seize to the stud ends and tighten the fresh copper nuts using an alternating, cross-pattern sequence starting from the center ports working outward. Apply 16Nm.
RDI Feed Lines: Reinstall the oil and liquid feed and return lines using its tabbed gasket (pro-tip: line up and loosely catch the lower return lines before fully setting the turbo flat onto the head studs to save workspace strain). Mount the lambda sensor back into place.
Vacuum Routing: Reconnect the complete vacuum infrastructure. Map the hoses precisely between the wastegate actuator diaphragm, the cycle waste valve (boost control solenoid), and the electric switching valves.(Full VIDEO Available HERE)
Coolant Bleeding & First Start: Fill the cooling system with fresh antifreeze. To prevent air locks, pull the metal clip away from the engine temperature/thermostat sensor to purge trapped air until a clear whistling sound subsides.
Pre-Lubrication Crank: Crank the engine over 2 to 3 times for 5-second intervals with the ignition or fuel system disabled to prime the internal turbo bearings with fresh oil pressure. Start the engine normally and allow it to idle smoothly for 20 minutes to monitor for fluid or exhaust leaks.


