Quick Info
Model
450, 452
Estimated Cost
15€
Difficulty
Beginner
Time Required
30 Minutes
Safety Notes
The "Punch" Risk: When removing the original gear knob, it requires a very strong, straight pull upwards. Be careful not to lean over the gear stick, as the knob will release suddenly, and you risk punching yourself in the face or the roof of the car!
Wiring Warning (Softouch only): If your car has the automatic mode button on the side of the gear knob, there is a delicate wire inside. Do not twist the knob during removal, or you will snap this wire.
Tightening: Ensure the small grub screw on the new aluminum knob is tightened securely to prevent the knob from rotating or coming loose while driving.
Step-by-Step Guide
Introduction
The factory gear knob in the Smart Roadster is made of rubber and plastic. After years of use, the rubber often becomes shiny, sticky, or begins to peel, making the interior look tired. Upgrading to a solid aluminum gear knob is one of the most popular interior modifications.
Not only does it look fantastic—matching the other metallic accents in the cabin—but it also adds a bit of weight to the gear stick, making the shifting action feel slightly more mechanical and solid. This guide covers the installation of a screw-fit aftermarket aluminum gear knob, specifically the type that clamps onto the metal gear shaft.
Preparation for Removal
Sit in the driver's seat and put the car in Neutral (N).
This provides the best angle for pulling the knob upwards.
If your car has the Softouch automatic button on the side of the gear knob, take a moment to understand that you must pull straight up without twisting, as there is a wire running down the center of the shaft.


Removing the Factory Knob
Grip the factory gear knob firmly with both hands.
Straddle the center console if necessary to get good leverage.
Pull the knob straight up with a strong, sharp motion.
It is held on only by a friction fit over a metal spring clip.
Be prepared for it to release suddenly. Do not twist the knob.
Once released, lift it off the shaft (unplug the small wire connector if you have the Softouch button).
Preparing the New Aluminum Knob
Take your new aluminum gear knob out of its packaging.
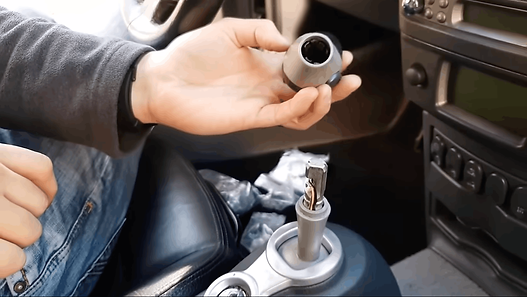
Notice the small threaded hole on the front or side of the knob—this is for the grub screw (set screw) that will secure it to the shaft.
Most aftermarket kits will include the small screw and a corresponding Allen key (hex wrench).

Installing the New Knob
Slide the new aluminum gear knob down onto the bare metal gear shaft.
Ensure that the shift pattern graphic (if present on the top of the knob) is facing perfectly forward and aligned correctly.
If your new knob is designed to accommodate the Softouch wire, ensure it is routed correctly according to the manufacturer's instructions.
Securing the Fit
Using the provided Allen key, tighten the small grub screw located on the front or side of the aluminum knob. This screw presses against the metal shaft, locking the knob in place.
Tighten it firmly, but do not overtighten and strip the threads.
Test the installation by trying to twist the knob—it should not move at all.
Turn on the ignition and shift through the gears to ensure smooth operation.


